Getting Started with Flowlab
Step by step introduction to using Flowlab. This guide walks through all the
steps required to get started building a simple game.
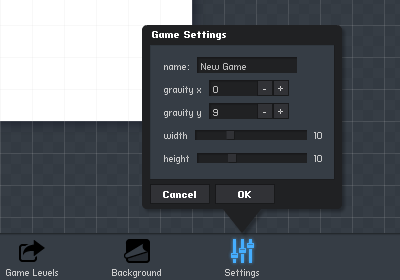
Game Settings
It is a good idea to first set up your game in the settings panel before you get
started building. Don't worry, all of these settings can be changed at any time.
- name: Type a name for your new game here. It can be pretty much whatever you like.
- gravity x: This is the amount of gravity affecting your game on the X (horizontal) axis.
Normally this will be 0, but feel free to experiment
- gravity y: This is the amount of gravity affecting your game on the Y (vertical) axis.
This will often be a positive number (gravity pulling down), or maybe zero if your game doesn't need any gravity.
- width: how wide the game's playable view will be. For example if this is set to 10, the game will be 10 tiles wide.
- height: how tall the game's playable view will be.
Creating Game Objects
Game objects can be used to build game levels, players, enemies,
and everything else that makes up your game world. You create a new game
object by clicking anywhere on the screen and selecting "create"
from the pop-up menu.
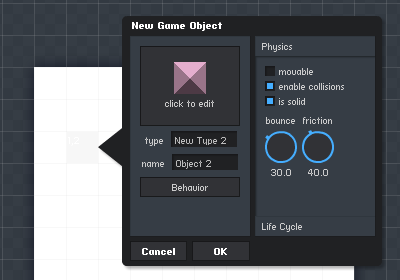
- type: Type is a label that describes what sort of object this is. All objects of the same
type will share the same image sprite and behavior. Example types could be "Player", "Grass", "Asteroid", or "Ball""
- name: Since there can be many objects of a given type, you may want to give this specific object a
name of it's own.
Note: To move an object you have created, click and hold that object for a moment.
It will disconnect from the world and allow you to drag it around.
Physics
All objects have physical characteristics that describe how they interact with the world and each other. The "Physics"
panel allows you configure these physical attributes.
- movable: Whether this object can be moved around during the game, or pulled by gravity. For example, a player object
will usually be movable, but a wall or bit of terrain probably won't.
- enable collisions: Whether collision events are triggered by this object. These events can be used by behaviors.
- is solid: Solid objects do not pass through one another.
Chances are that the default block graphic generated for your new object will not be suitable, but we
can easily edit the graphics directly by clicking on the sprite thumbnail labeled "click to edit"
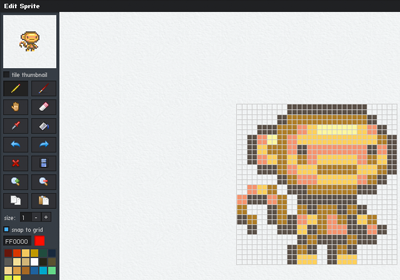
Graphics Editing
You can delete the sprite and start with a fresh canvas by clicking the red "X" button. Clicking
the color swatches allows you to select a color, and drawing is done with the pencil and brush tools.
The grid can be adjusted or disabled with the grid "size" selector. Your new sprite image is saved
automatically when you click OK.
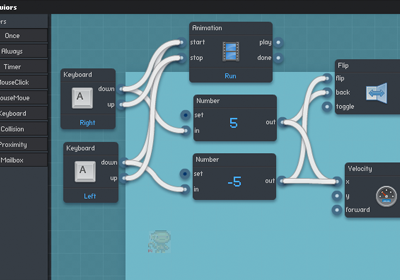
Bringing Your Objects to Life
in order to add behaviors to an object, click it and select "Edit". On the object edit panel, there is
a "Behavior" button, which brings up the behavior editor for that object.
The behavior editor is where all of your game's logic gets built. Add behaviors by selecting them from the list
on the left, and link them together to create more sophisticated logic. Individual behaviors can be configured
by clicking on them to bring up their settings.
See the Introduction to Behaviors for a more in-depth look at creating behaviors.
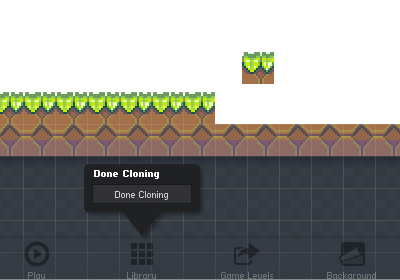
Cloning Objects
Many types of objects will be duplicated in the game world. When you click on an object,
select the "clone" option to begin making clones. Now when you click, clones of that object
will be added to the game. These clones will share all the same settings, behaviors, and graphics.
This means that changing any clone will automatically update them all.
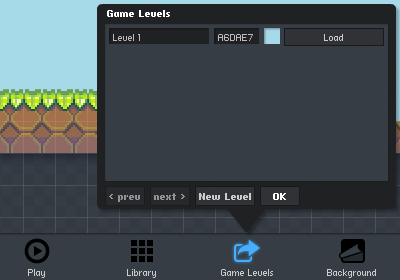
Game Levels
The game levels panel allows you to add new game levels and switch between them. Click on the
color swatch next to each level name to change the background color of that level.
Running Your Game
To test out the game between changes, either click the "Play" button on the bottom
toolbar, or hit the "Esc" key. While playing, the "Esc" key will bring you
back into the editor.